Pages

My Journey into the Land of Wallpaper Removal

Saturday, June 25, 2016


Being a first time home buyer and a newbie when it comes to wallpaper removal, I need all the help I can get when it comes to the rehab on the walls in my home. Five out of six rooms are wallpapered. Three out of three bathrooms are wallpapered. And I haven’t mentioned the wallpaper in the hallways yet. Luckily, we have many friends who have been on this long journey into the land of wallpaper removal before and offered us their advice and supplies. I’m only on day two of the wallpaper project but here’s the progress so far.
Wall 1: Kitchen
 
Our friend let us borrow his scoring tool for wallpaper removal. You rub it against the wall in a circular motion and it makes tiny tears in the paper.

 
This is supposed to aide in taking down the wallpaper.


After the wall was prepped, I used my first method: 1:1 ratio of fabric softener to water. I gave each panel a good spray and went to peeling. I used a scrapper with a beveled edge to help remove stubborn portions of wallpaper, but overall just used my hands to pull away the paper. The section pictured took about an hour to complete.
Pros:
·         Easy to peel
Cons
·         Messy (you will get messy, the walls will get messy, and your floors will get messy)
 
 
Wall 2: Living Room
 
Looks like nothing's there, right? Wrong. The wallpaper looks like a faded fake marble.
 
Left side is scored, right side is not.
 
I tried scoring one side of the wall and then skipped the other side to see if the prep made any difference. To me, the scoring didn’t make the paper removal process any better or worse than the non-scored side. This time however, I used a steamer.
 
 
The directions indicated that it would take 10-12 minutes for the steamer to start producing steam (which seemed accurate). I would hold the steaming plate over a section of the wall for about ten seconds and move on to another spot. I mostly had to use my scrapper to get the wallpaper off since my other hand was busy using the steamer. This section was smaller and took about an hour and a half.
Pros:
·         Clean
Cons
·         Hot! The steaming plate and the piping to the steamer were both very hot. Don’t wear open toed shoes when doing this as water drips from the plate and onto your feet, hands, and legs. If you’re taking down wallpaper in the summer like I am WITHOUT air conditioning, it will get very steamy very quickly.
·         Takes longer. I felt like I had to sit and wait for the steamer to penetrate one section and then scrape, scrape, scrape. Then hold the steaming plate over the next section of wallpaper, wait, scrape, scrape, scrape. I couldn’t pull off big chunks with both of my hands because you can’t really set the steamer down or water will collect inside the plate.
 
So pretty, so clean!
 
Summary:
Overall both methods were effective. I will use both again. The fabric softener method because it was quick. The steamer method because it was clean. I don’t think I will score the walls for prepping anymore just because it takes up a good chunk of time and I didn’t see a huge difference it terms of how easy it was to peel wallpaper when I didn’t score.
Check back for updates on the kitchen and living room!
 
Wish me luck on the next projects: guest bedrooms and the office!


Why We Bought a Fixer Upper

Sunday, June 19, 2016


1.       We will get exactly what we want...eventually.
 

If a flipped house is done to your taste, that’s great! However, I simply didn’t like some of the work done to the houses we looked at. I know subway tile, white cabinets, and marble are all so beautiful…but… and you’re gonna be shocked… I really don’t like it. At first I felt bad that I just didn’t care for the finish in these new homes. Then I thought about it…why am I paying top dollar for a house I would want to redo anyways?
The fixer upper we bought has great potential to be exactly what we want.
Yeah, teal countertops and red sinks aren't really my thing, but eventually I will have a large kitchen layout that is exactly what I want!

2.       We weren’t outbid.

The flipped houses we saw were priced competitively and off the market within a few days. The first three times we put in offers we did our very best. But so did someone else. In each case people bid over asking price. This game we were playing with other buyers was so not fun. One of the houses was booked back to back with showings in fifteen minute increments. I felt almost forced out of looking at the home since other people were waiting for us to leave. In another situation we were told we got the home and then a few hours later they accepted a higher offer. For me, it felt like cash was king, and the people behind the purchase were irrelevant.

We saw the fixer upper two times in one day so both my husband and I could see it. No rush to leave, we took our time discussing the house and the offer we wanted to present. Not only were we not outbid but they just accepted, no back and forth.

This is our back yard! When we met the sellers they let us know that they picked out and planted every bush, tree, flower, and rock. To me, the people behind the home are important too.

 
3.       It had what we needed.

Because some of the flipped houses were so shiny and new we overlooked some major flaws. One bathroom instead of two, a three bedroom house that only had two bedrooms (the third bedroom was in the attic and my husband couldn’t stand up straight), and school districts we weren’t too crazy about, just to name a few. We came up with excuses like “Oh, we’ll just move before our kids go to school” or “you can’t even hear the highway from the backyard”.

Our new home has the three bedrooms/ two bathrooms we were looking for and the school district we were after. Yes… it’s vintage 70s throughout, wallpapered galore, and has three different choices in tile in ONE room! But has the foundation we were looking for. Each room has potential for what we envision it to be someday.

Not lying about the tile.
Or the wallpaper.


Let me sum up what I mean with an analogy. Our house is like that nerdy kid in high school who hasn’t  reached his potential yet. The brand new flips we looked at are like the hot girl online. That girl is all surface, attractive at first but a few annoying things over time will start to make her less attractive and you’ll see things you wish you could change. That nerdy guy is a decent person, he might need braces, a new outfit, and a haircut, but he was who were looking for the whole time.
 
 
Check back for updates of our fixer upper's makeover!

Handmade Dining Table

Saturday, June 11, 2016

 
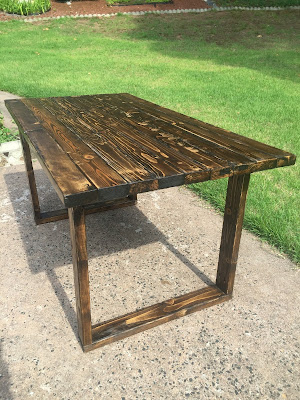
Drew Danielle Design offers quality, handmade furniture. This warm and inviting dining table is a custom design and is not sold anywhere else.  The distressed dining table will instantly add charm to your home. Its espresso finish accentuates the texture of the wood grain. Picture this dining table in your home!
 
Contact me here.
60 in. (l) x 31.5 in. (w) x 29.5 in. (h)
Status: For Sale $400


Skinny Fruit Trough

Saturday, June 4, 2016


One activity I love during Connecticut's summers is going to the Farmer's Market. That means fresh fruits and veggies.
Use your scrap wood to make this easy, skinny fruit trough.
I used 3 inch wide planks and glued them together.


I used some finishing nails and all done!
 
 
I've been anxious to try this stain since I heard good things about the finish.

 
In my experience, the rougher condition the wood is in the better. I tried this stain once before on a really smooth piece of wood and the color barely showed up. This scrap wood had chunks missing and little nooks and crannies all over the place.


Alternatives to the (fruit) in the fruit trough:
Dried hydrangeas
 
Add soil and plant your favorite herbs
 
Decorate for the season; Think gourds and mini pumpkins in the Fall
 
School supplies; Make a command center for homework or a coloring station


Happy Summer!