Pages

Vacation Inspiration Art

Saturday, June 27, 2015


Negative: My Artwork

Positive: Vacation Memories

 
Something I love about canvas is that it’s so versatile. Above is a beach inspired painting that I made simply by drawing “x’s”.
Since I actually visited one of the most beautiful beaches I’ve ever seen, Waikiki Beach, I decided to upgrade our artwork.

What you’ll need for this project:

A photo print (mine is called an engineer print; engineer prints supposedly are not meant to be printed in color to catch all details but I think it came out great)

 
rope detail
 
building in the distance


A canvas


Mod Podge and applicator


First I borrowed a canvas from a previous project Chic Canvas Art, since I didn’t need it anymore.


I started to cut the fabric around the staples and then realized the staples just popped out if I pulled hard enough.

 
Next I prepped the canvas by painting two coats of mod podge on.


I centered the picture and allowed it to dry (about 10 minutes).
*** A note about bubbling: If you are looking for minimal bubbling, I recommend you use a harder backing than canvas such as wood, or do not use mod podge. In my experience, there are ALWAYS bubbles and imperfections when using mod podge***
I ended up using my fingers to smooth out the bubbling.


I put a layer on mod podge on top as well (Looks scary but it dries clear).


In about 30 minutes I had new artwork ready to hang.
Before:


After:


Here are more of my vacation photos, just for you!


Transform your Backyard into an Oasis: Bamboo Planters

Saturday, June 20, 2015

For our rehearsal dinner we decided to have a “luau” in honor of our honeymoon destination of Hawaii. My stepdad, Joe, has been at work for the past two years transforming his backyard into an oasis.
 
Follow these easy steps to create a bamboo planter.
 
 
1.       Use an old painting bucket and paint black (or color of choice).
 
 
2.       Attach a drip pan for water to collect. (I think he used the bucket top).


3.       Buy a bamboo mat and cut to size. Secure to the bucket. (Joe used wiring to do so).
 
 
4.       Insert plant. (Joe also added rocks to the top).
 
5. Enjoy the scenery.
 
Aloha!


Monogrammed Wedding Cake Stand

Monday, June 15, 2015

 
Negative: $100 cake stands
 
Positive: Bonding time with my step dad
Of course I’m posting today even though it's the second day of my beautiful honeymoon in Hawaii! We can't seem to get used  to the time change. We woke up at 4:15 Hawaii time, 10:15 east coast time.


 So why not post a wedding related project.

 
Since my cake baker did not provide a cake stand, I needed to find one myself. After searching every department store and online shop, I decided it just wasn’t worth the time looking and the money being spent on something that will get 1 minute of attention. Since my step dad had already built me an arbor, and pillars (other highly expensive wedding items) I kindly asked (the week of the wedding) if he would build me a cake stand which rang in at the cost of $12.
 
First we cut the wood to the specifications: a 16 inch square, 5 inches high.
Sorry about Joe's shirtlessness, it was extremely hot.
 
Then we cut the edges at a 45 degree angle to make invisible seams.


We glued the sides together putting the top on last.


He finished the project with the nail gun.


Tip from Joe: To patch any crack in the seams, mix sawdust with wood glue and wipe over and into the cracks.
 

We needed to sand the box to be painted and we added a monogram with glue. (Dollar bin at Michaels Craft Store)


This monogrammed wedding cake stand is an easy project I recommend to any stressing bride. I had a two year engagement to plan all of the final details, and things like the “cake stand” still slipped through the cracks.


Check back for more wedding day creations!

Cherry Furniture Debate

Sunday, June 7, 2015


Negative: Cherry Furniture

Positive: An Open Mind

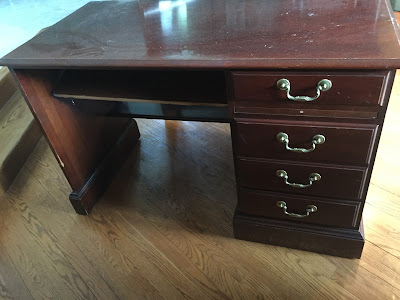
My client has a cherry desk that isn’t a perfect match for her home.

Most of my research shows that cherry is a great quality wood and not to mess with it, but what to do when your client doesn’t care for it?

So what do you think? Do you love your cherry furniture or wish you could change it?

Check back for updates! P.S. I’m leaning towards an espresso gel stain.

DIY: Father's Day Gift Basket


Negative: Living Far from Home

Positive: Creative Gift Ideas

If you’re anything like me, finding a gift for dad is an impossible task. I’ve resorted to gift baskets that far exceeded their worth. You know, the gift baskets with smoked meats, steaks, fruits, wine of the month.
DIY your own basket, like this:

Beer bottle opener

Towels (to clean up the mess at the grill)

Favorite beer (with lime if needed)

Sauce pot and basting brush

Favorite marinade (in this case ranch and ketchup…don’t ask)

What I love: You can personalize this gift to your dad’s favorites rather than the pre-made baskets a company gives you. Is he a chocolate lover? Fill your basket with treats and his favorite movie! Sports fan? Get him some sports gear and his go-to snack for the game.

Happy Father’s Day Dads!